
Kubeflow is an open-source platform that makes it easy to deploy and manage machine learning (ML) workflows on Kubernetes, a popular open-source system for automating containerized applications’ deployment, scaling, and management.
Kubeflow can help you run machine learning tasks on your computer by making it easy to set up and manage a cluster of computers to work together on the task.
It acts like a “traffic cop” for your computer work, ensuring all the tasks’ different steps are done in the right order and that all the computers are working together correctly. This way, you can focus on the task at hand, such as making predictions or finding patterns in your data, and let Kubeflow handle the underlying infrastructure.

Imagine you have a big toy box with many different toys inside. Kubeflow is like the toy box organizer. It helps you track all the different toy types and ensure they’re in the right place.
Kubernetes is like the toy box itself. It keeps all the toys together and ensures they don’t get lost. It also helps you easily take out the toys you want to play with and put them back when you’re done.
In simple words, Kubeflow makes it easy to run and manage ML workflows on top of Kubernetes, which helps manage and scale containerized applications.
This article will go through an end-to-end example of using Kubeflow to build, train, and deploy an ML model, from data preparation to model serving. We’ll cover the various components of Kubeflow and how they work together to make the ML workflow more efficient and streamlined.
By the end of this article, you’ll have a better understanding of how to use Kubeflow to manage your ML projects and be able to apply the concepts to your own projects.
Learning Objectives:
- Understand the basics of Kubeflow and its components
- Understand how to use Kubeflow to manage ML workflows
- Learn how to deploy Kubeflow on a Kubernetes cluster
- Learn how to use Kubeflow to train and deploy ML models
Table of contents
- What is Kubeflow?
- Deploying Kubeflow on a Kubernetes cluster
- Managing ML workflows with Kubeflow
- Training and deploying ML models with Kubeflow
- Kubeflow pipeline
- Track the progress and results of the pipeline runs
- Model evaluation
- Model deployment and hyperparameter tuning in the pipeline
- Conclusion
What is Kubeflow?
Kubeflow is used to simplify the deployment and management of machine learning (ML) workflows on Kubernetes. It provides a set of tools and frameworks that enable data scientists and ML engineers to easily build, train, and deploy ML models in a scalable and repeatable way.
By leveraging the power of Kubernetes, Kubeflow can manage the underlying infrastructure and dependencies, making it easy for data scientists and engineers to focus on building and deploying ML models. Additionally, its ability to be deployed on any Kubernetes cluster and its modular and extensible architecture make it a powerful and flexible tool for MLOps.
- Kubeflow is an open-source project for managing machine learning workflows on Kubernetes.
- It provides a set of tools and frameworks for data scientists and ML engineers to easily build, train, and deploy ML models.
- It leverages the power of Kubernetes to manage underlying infrastructure and dependencies.
Deploying Kubeflow on a Kubernetes cluster
This article will discuss how to deploy Kubeflow using the CLI. Kubeflow can be deployed on any Kubernetes cluster, whether it’s on-premises, in the cloud, or at the edge. There are two main ways to deploy Kubeflow:
A. Command-line interface (CLI), or
B. The graphical user interface (GUI)
Managing ML workflows with Kubeflow
- Kubeflow provides a set of tools foraging ML workflows, including JupyterHub, TensorFlow Job, and Katib.
- JupyterHub allows data scientists to access and run Jupyter Notebooks easily.
- TensorFlow Job and Katib provide tools for running distributed training jobs and hyperparameter tuning, respectively.
Training and deploying ML models with Kubeflow
- Kubeflow provides a set of tools for training and deploying ML models, including TensorFlow Training, TensorFlow Serving, and Seldon.
- TensorFlow Training allows data scientists to train ML models using TensorFlow easily.
- TensorFlow Serving and Seldon provide tools for deploying trained models to production.
Kubeflow Pipeline
- Set up a Kubernetes cluster.
- Install Kubeflow on the cluster.
- Create a Python script that’ll be used as the main component of the pipeline.
- Use the Kubeflow Pipelines SDK to create the pipeline.
- Run the pipeline.
- Track the progress and results of the pipeline runs.
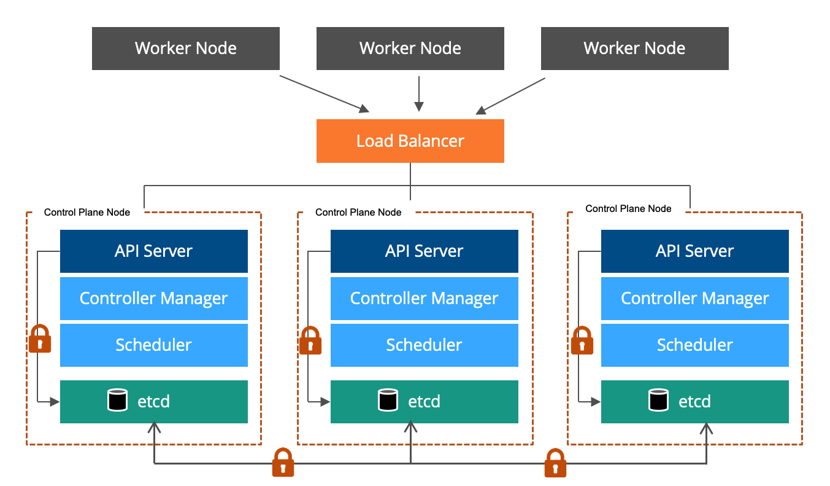
What is a Kubernetes Cluster?
A Kubernetes cluster is like a group of computers that work together to ensure your programs run smoothly. The group comprises of two types of computers, the master and the worker. The master computer is like the boss, and ensures everything is running as it should be, and the worker computers are like the helpers who do the actual work of running your programs.
The master and worker computers talk to each other to ensure everything works correctly. Kubernetes helps you run, manage, and scale your computer programs easily and efficiently, just like how a good boss and a team of helpers can make your work easier.
- Master nodes
- Worker nodes
- Etcd
- Networking
Kubernetes can be installed on-premise, on cloud providers like AWS, GCP, or Azure, or using managed Kubernetes services like EKS, GKE, and AKS.
Master nodes are like the leaders of the group of computers in a Kubernetes cluster. They ensure everything is running well and decide which computers should do certain jobs. They use special tools like the API server and the kube-scheduler to do this. Think of it like the leaders of a group making a plan and giving jobs to the other members of the group.

Worker nodes are like helpers in a group of computers in a Kubernetes cluster. They do the actual work of running programs and ensure they’re working correctly. They use special tools like kubelet and kube-proxy to do this. They also talk to the master nodes to let them know how things are going. Think of it like helpers in a group who do the tasks and let the leaders know how it’s going.

Etcd is a distributed key-value store used by the Kubernetes control plane to store the configuration data for the cluster. It’s like a big notebook where the leaders of the group of computers in a Kubernetes cluster keep entrant information about how everything should be set up.
They use it to ensure everything is running as it should be, and it’s shared across all the computers in the group, so they all have the same information. Think of it like a shared notebook that everyone in the group can see and use to ensure they’re all on the same page.
Networking in a Kubernetes cluster is configuring how the cluster’s different components communicate with each other, including pods, services, and nodes. Pods are the smallest deployable units and have their own IP addresses, and services are used to access pods and provide a stable endpoint. They’re assigned an IP address called ClusterIP that’s only reachable within the cluster.
To allow communication between pods and services in different nodes, Kubernetes uses a networking plugin called the Container Network Interface (CNI), which is responsible for creating and managing the network bridges and virtual interfaces that connect the pods and services.
For external communication, Kubernetes uses Ingress, a collection of rules that allows external traffic to access services inside the cluster, usually associated with a LoadBalancer or NodePort service which provides a stable endpoint for external communication.

Here’s an example of how you might set up a Kubernetes cluster using the command-line tool, kubeadm, and a few additional scripts. This example assumes you already have a group of machines (VMs, bare-metal, etc.) that you want to use as your cluster, and they all have Ubuntu 18.04 installed.
Step 1: Install the necessary packages
sudo apt-get update && sudo apt-get install -y apt-transport-https curlcurl -s https://packages.cloud.google.com/apt/doc/apt-key.gpg | sudo apt-key add -cat <
Here is an example of how you might set up a Kubernetes cluster using the command-line tool, kubeadm, and a few additional scripts. This example assumes you already have a group of machines (VMs, bare-metal, etc.) that you want to use as your cluster and that they all have Ubuntu 18.04 installed.
To make a group of computers work together as a Kubernetes cluster, we use kubeadm. We first put special computer programs called packages on all the computers in the group. Then, we pick one computer to be the leader, and we tell it how we want the group to work together by using kubeadm.
We also make sure that all the computers can talk to each other. curl curl tells all the other computers in the group to listen to the leader. We can check if everything is working well by asking kubectl, another special computer program.
Initialize the cluster on the master node:
sudo kubeadm init --pod-network-cidr=10.244.0.0/16
This command will configure the master node and create a default configuration file in /etc/kubernetes/admin.conf
On the worker nodes, join the cluster using the command:
sudo kubeadm join : --token --discovery-token-ca-cert-hash sha256:
This command can be found in the output of the kubeadm init command on the master node.
Once the worker nodes have joined the cluster, you can check the status of the nodes using the command.
You should see the master and worker nodes in the list.
To use the cluster, you need to configure kubectl to use the admin.conf file that was created in step 2:
mkdir -p $HOME/.kube
sudo cp -i /etc/kubernet
Step 2: Install Kubeflow on the cluster
Install the kfctl command-line tool, which is a command-line utility used to deploy and manage Kubeflow; you can download the latest version of it by using this command:
curl -LO https://github.com/kubeflow/kfctl/releases/download/v1.3.0/kfctl_v1.3.0_linux.tar.gz
Extract the downloaded tar file:
tar xzf kfctl_v1.3.0_linux.tar.gz
A directory for your Kubeflow configuration:
mkdir kubeflow-configcd kubeflow-config
Download the Kubeflow configuration file. By using this command, you’ll be able to download the kubeflow configuration file:
curl -O https://raw.githubusercontent.com/kubeflow/kubeflow/v1.3-branch/bootstrap/config/kfctl_k8s_istio.v1.3.0.yaml
Use the kfctl command-line tool to install Kubeflow:
./kKubernetesly -V -f kfctl_k8s_istio.v1.3.0.yaml
This command will deploy the Kubeflow components on the cluster; you can check the status of the deployment by running kubectl get pods -n kubeflow
Once all the pods are running, and in a running state, you can access the Kubeflow UI by running the Kubeflow dashboard.
Note: The commands and code examples provided should be executed in a terminal window or command prompt, which is a command-line interface that allows you to interact with the operating system.
You can open a terminal by pressing the Ctrl + Alt + T key combination or by searching for “terminal” in the applications menu. Once the terminal is open, you can type in the commands and press the enter key to run them.
Using a terminal application such as ssh is recommended to connect to each machine, as it allows you to run commands on remote machines as if you were sitting in front of them.
Keep in mind that these commands will make changes to the system and may require superuser or root access, so it’s important to run them with the appropriate permissions, starting with the master node on each machine in the cluster.
Step 3: Create a Python script that will be used as the main component of the pipeline
!pip install kfp
import kfpfrom kfp import dsl@dsl.pipeline( name='My Pipeline', description='A simp
Step 4:Use the Kubeflow Pipelines SDK to create the pipeline
An example of how to use the Kubeflow Pipelines SDK to create the pipeline defined in the previous example:
Python SDK
import kfp
client = kfp.Client()
Compile the pipeline DSL compiler
pipeline_func = my_pipeline
pipeline_filename = 'my_pipeline.py'
compiler = kfp.compiler.Compiler()
compiler.compile(pipeline_func, pipeline_filename)
Create the pipeline in Kubeflow
experiment_name = 'My Experiment'
run_name = 'My Run'
arguments = {'input_data':'gs://my-bucket/input/',
'output_data':'gs://my-bucket/output/',
'model_path':'gs://my-bucket/models/'}
“experiment_name” is like giving your project a name, such as “My Science Project.”
“run_name” is giving a name to a specific time you did your project, like “My Science Project – First Try”.
“arguments” is the list of things you need for your project, such as the materials you need for a science experiment. E.g. “input_data”, “output_data”, and “model_path” are like different types of materials you need for the project and where you can find them.
For example, “input_data” includes the things you need to start your project, “output_data” includes the things you make while doing your project, and “model_path” is the instructions you need to follow to do your project.
Step 5: Submit a pipeline run
run_result = client.create_run_from_pipeline_func(pipeline_func,
In this example, the pipeline is first compiled using the kfp.compiler.Compiler() class and saved to the file, ‘my_pipeline.py.’ Then, an instance of the kfp.Client() class is created and used to create the pipeline in Kubeflow by calling the create_run_from_pipeline_func method.
The method takes in the pipeline function, the experiment’s name, the run’s name, and a dictionary of arguments that’ll be passed to the pipeline. After submitting the pipeline run, the pipeline will be executed, and the run results can be viewed on the Kubeflow Pipelines UI.

Note: The first code example defines the pipeline using the KFP SDK, while the second code example uses the KFP SDK to create and run the pipeline on Kubeflow. The first script focuses on the pipeline structure, steps, and inputs/outputs, while the second script focuses on the interaction with the Kubeflow service to create, compile, and run the pipeline.
With the knowledge we’ve gained about Kubeflow pipelines, we’re now ready to create our first pipeline using the Iris dataset.
from kfp import dsl
from sklearn import datasets
from sklearn.model_selection import train_test_split
from sklearn.metrics import accuracy_score
from sklearn.svm import SVC
This pipeline uses the Iris dataset and trains a support vector classifier (SVC) model with a specified kernel and learning rate. It then evaluates the model’s accuracy on a test set and prints the accuracy score.
Run the pipeline using Kubeflow pipelines SDK:
from kfp import Client
client = Client()
EXPERIMENT_NAME = 'Iris classification'
run_result = client.create_run_from_pipeline_func(iris_classification_pipeline_func, experiment_name=EXPERIMENT_NAME)
Step 6: Track the progress and results of the pipeline runs
Now that we have a clear understanding of creating a Kubeflow pipeline using the Iris dataset, we can begin tracking the progress and results of our pipeline runs. This can be done by monitoring the pipeline’s status, viewing the outputs of each pipeline step, and analyzing the results of the pipeline run as a whole.
This allows us to ensure the pipeline is running smoothly, identify any issues that may arise, and make any necessary adjustments to improve the pipeline’s performance.
Additionally, we can use this information to evaluate the effectiveness of our machine-learning models and optimize their performance.
Model evaluation
To evaluate the performance of a model within a Kubeflow pipeline, you can use the “Evaluator” component. This component takes in the trained model and a dataset and outputs metrics such as accuracy, precision, recall, and F1 score.
Here’s how to use the “Evaluator” component:
- Inputs:
- trained_model: the trained model that you want to evaluate
- test_data: the dataset that you want to use for evaluation
- Outputs:
- Metrics: the evaluation metrics
- Parameters:
- metric_names: the names of the metrics that you want to compute (e.g. “accuracy”, “precision”, “recall”)
from kfp import components
evaluator = components.load_component_from_url('https://raw.githubusercontent.com/kubeflow/pipelines/v0.5.1/components/evaluator/component.yaml')
@dsl.pipeline(
name='Iris classification pipeline',
description='A pipeline to train and evaluate a model on the Iris dataset'
)
def iris_classification_pipeline():
#define pipeline steps here
...
eval_results = evaluator(
trained_model=train_step.outputs['model'],
test_data=load_data_step.outputs['data'],
metric_names=['accuracy', 'precision', 'recall', 'f1_score']
).outputs['metrics']
...
In this example, the evaluator component takes the output of the train_step component, which is the trained model, and the output of the load_data_step component, which is the test dataset. The metric_names parameter is set to compute accuracy, precision, recall, and F1 score. The output of the evaluator component is a dictionary of metrics, which can be accessed via the metrics key.
Now we can add a new component called ‘evaluate_step’ after the ‘train_step’ component in our pipeline. This component will take the output of the ‘train_step’ component, which is the trained model, and the output of the ‘load_data_step’ component, which is the test dataset.
In the ‘evaluate_step’ component, we will:
- Use the sci-kit learn library to create a confusion matrix using the trained model and test dataset, giving us a visual representation of the number of correct and incorrect predictions made by the model.
- The ROC curve will help us evaluate the model’s performance by plotting the true positive rate against the false positive rate.
from sklearn.metrics import confusion_matrix, roc_curve
from sklearn.metrics import auc
def evaluate_step(model, test_data):
# make predictions on test data
test_predictions = model.predict(test_data.data)
# create confusion matrix
confusion_mat = confusion_matrix(test_data.target, test_predictions)
print("Confusion Matrix:",confusion_mat)
# calculate true positive rate and false positive rate
fpr, tpr, thresholds = roc_curve(test_data.target, test_predictions)
roc_auc = auc(fpr, tpr)
return {"fpr": fpr, "tpr": tpr, "roc_auc": roc_auc}
This component will give you a dictionary with fpr, tpr, and roc_auc, which you can use for plotting the ROC curve.
Model deployment and hyperparameter tuning in the pipeline
# define pipeline and pipeline steps
@dsl.pipeline(name="Iris pipeline")
def kfpipeline():
# train with hyper-parameters
train = mlrun.import_function('hub://sklearn_classifier').as_step(
name="train",
parama s={"sample" : -1,
"label_column" : y,
"test_size" : 0.10,
'model_pkg_class': "sklearthe n.ensemble.RandomForestClassifier",
'n_estimators': 10, # added hyperparameter
'max_depth': 3, # added hyperparameter
'random_state': 42}, # added hyperparameter
inputs={"dataset" : X},
outputs=['model', 'test_set'])
# deploy our model as a serverless function, we can pass a list of models to serve
deploy = mlrun.import_function('hub://v2_model_server').deploy_step(
models=[{"key": "iris_model:v1", "model_path": train.outputs['model']}])
# test out new model server (via REST API calls)
tester = mlrun.import_function('hub://v2_model_tester').as_step(
name='model-tester',
params={'addr': deploy.outputs['endpoint'], 'model': "iris_model:v1"},
inputs={'table': train.outputs['test_set']})
In this example, I’ve added hyperparameters for the Random Forest classifier, such as n_estimators, max_depth, and random_state, and set values for them.
I’ve changed the label_column to y, which is the target variable of the Iris dataset, and the dataset input to X, which is the feature variable of the Iris dataset. I’ve also changed the model name to iris_model:v1.
Kubeflow may be set up using either the GUI (which only supports Google Cloud) or CLI. If you only want to experiment with Kubeflow, I advise using the GUI. If you want to perform a real permanent deployment, use the CLI.
CLI
CLI provides a text-based interface for interacting with a computer or software application. It allows users to input commands and receive output through a command-line prompt.
CLI is commonly used in system administration, programming, and automation tasks.
Some examples of CLI include the Windows Command Prompt, Linux Terminal, and the MacOS Terminal.
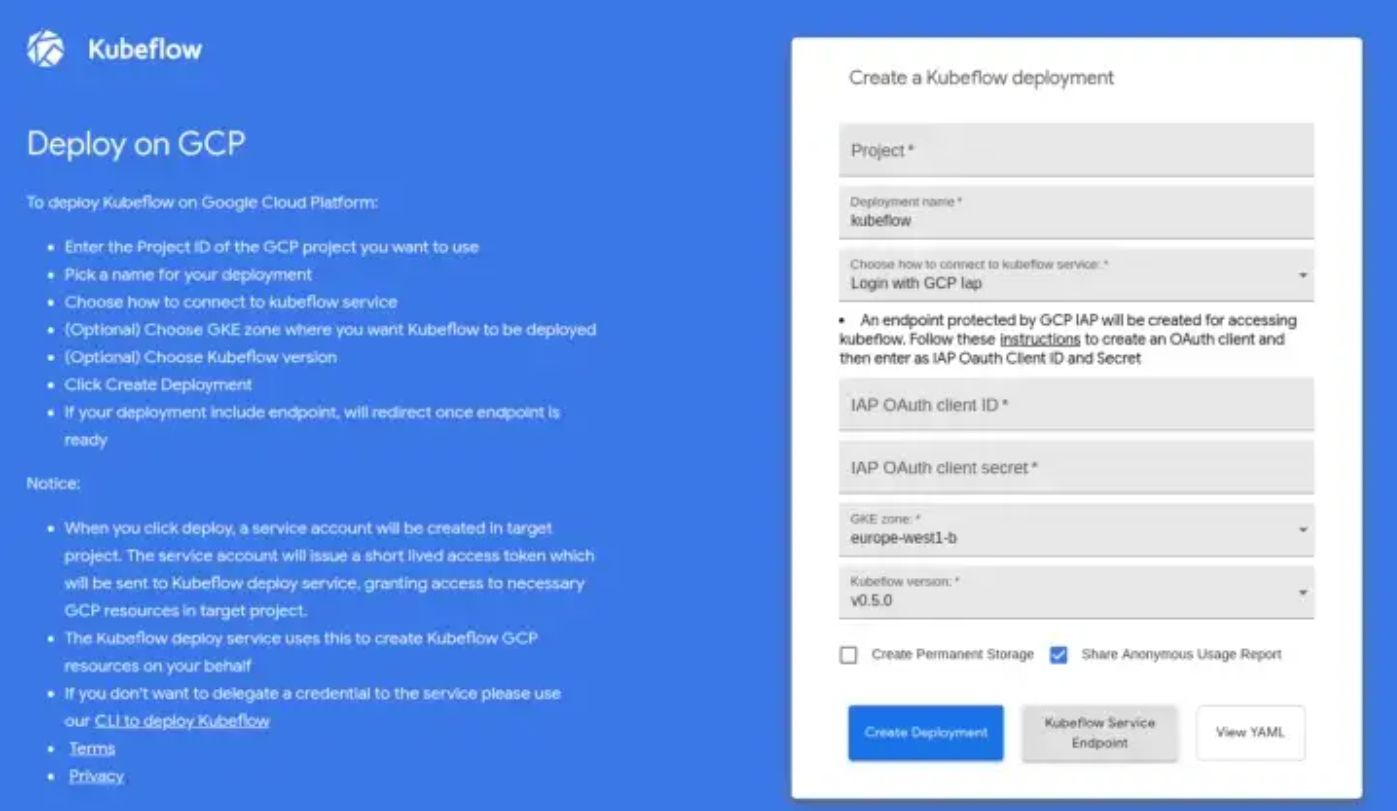
I chose the CLI deployment because the GUI deployment left some items out. Initially, ordinary computers were used in the deployment, even though I intended to operate the entire environment on pre-emptibles. Pre-emptibles are machines with a 24-hour kill time that’s 20% less expensive than regular instances.
Support for GPU-powered devices was another inclusion I really desired (and yes you guessed correct, also pre-emptible because I love our cheap stuff).
Conclusion
Kubeflow is a powerful tool for managing machine learning workflows on Kubernetes. Kubeflow is an open-source project that simplifies the deployment and management of machine learning workflows on Kubernetes. It provides a set of tools and frameworks that allow data scientists and IL engineers to easily build, train, and deploy ML models in a scalable and repeatable way.
Furthermore, Kubeflow’s use cases are not limited to specific industries, and they can be applied in several fields like healthcare and finance, where scalability, reliability, and security are crucial. The community-driven nature of the project ensures that it’s constantly evolving and improving, with new features and bug fixes being added regularly.
By following the steps outlined in this article, you should now have a better understanding of how to use Kubeflow to manage your ML projects and be able to apply the concepts to your own projects.
Key takeaways:
- Kubeflow is an open-source tool for automating and managing machine learning workflows on Kubernetes.
- It provides a set of tools and frameworks for data scientists and ML engineers to easily build, train, and deploy ML models.
